Top Rope Belay
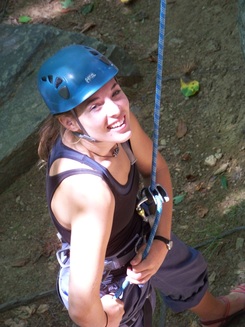
 Cristina giving a good top rope belay
Before even touching the rock, a new climber should learn to belay. Though it has none of the luster, appeal or glory of climbing itself, belaying is perhaps the most important aspect of the sport. If a climber falls while climbing on top rope, their weight transfers from the rock to the rope. As the belayer, you provide a brake on the rope to prevent the climber from falling to the ground. A belay device helps you provide this brake by applying friction to the rope. If you are not using the belay device properly, a fall could kill your climbing partner. HEY, THIS IS SERIOUS STUFF! It
is crucial that you receive professional instruction on how to belay. Do not use this guide as your only form of instruction!
|
At a Glance:
|
Standard Technique

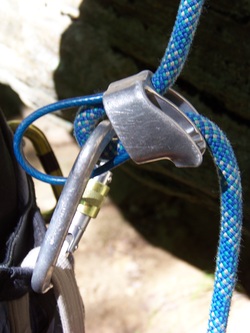
ATC-XP and Locking Carabiner
The belay device: There are many, many different belay devices out on the market. We are not going to delve into a discussion of the pros and cons of each belay device here. They all essentially perform the same basic function - they brake the rope in the event of a climber's fall. On this page we will discuss the 3 most popular belay devices for beginner climbers: the Black Diamond ATC, the ATC-XP (in photo) and the Petzl Gri-Gri. Check out this page to see more in depth comparison between the devices.
Basic instructions:
Basic instructions:
- Feed the rope through your belay device according to the instructions that came with the device and attach the belay device to a locking carabiner. If you are using the ATC or ATC-XP, be sure to clip the locking carabiner through the loop of the device and the rope.
- Attach the locking carabiner to your harness.
- LOCK THE CARABINER.
- Assume an athletic stance: legs shoulder width apart, feet on stable ground, in a position to view your climber for as much of the route as possible (see photo above). Also position yourself close to the face of the rock so that in the event of a fall the distance between you and the rock face is minimized.
- Use your preferred hand to provide a brake on the rope by being positioned against that same side's hip. Your secondary hand should either be below your right hand to provide a back-up brake, or above the belay device, working to take in slack.
- Be sure to run through the safety checks and commands with your partner before he starts climbing.
- As the climber ascends the route you must take in the slack in the rope system. In order to do this safely, you must never take your brake hand off the slack-side of the rope, which makes taking in slack somewhat tricky. *Watch the video above for a visual on how to perform this task!* First, pull in slack with your non-brake hand from above the belay device and with your brake hand from below the belay device. You should pull the slack out to the right of your hip with your brake hand. You should not pull upward, toward your non-brake hand, as this will put your brake hand quite far from the braking position. If you do this properly, you will find that your brake hand is extended way out from your body and you cannot take in any more slack without moving that hand. In order to get that hand back to your hip, position your non-brake hand just below your brake hand and slide your brake hand up the rope until it is positioned properly at your hip once again. Now you can release your non-brake hand and move it once again to above the belay device so that you can continue taking in slack. Repeat these motions as your climber ascend and be sure to always be in a position where applying a brake will be quick and easy.
- Practice this motion on the ground while your climbing partner simulates climbing by feeding rope through an anchor. Practice taking in slack and have an experienced climber watch you to critique your body positioning and movement.
Check out this excellent video from Climbing Magazine for an example of toprope belay technique:
Important Tips:
1. Keep your braking hand at least 6" down the rope from the belay device. If you keep your hand too close, in the event of a fall, your hand may get yanked into the belay device. This painfully pinches your hand and, even worse, causes you to let go of the rope and therefore releasing the brake for your partner. No brake = death/serious injury. It is surprising how natural it feels at first to keep your hand too close to the belay device. Be vigilant while belaying and always check that your hand has some good space.
2. Always be in a position ready to apply a brake. Assume that your climber is going to fall at any moment. Don't get distracted by the cutties climbing next to you or the squirrel eating your trail mix or your desire to snap a photo of your buddy. Keep your brake hand on the rope and in the locked off position (at your hip). Never compromise the brake by taking your hand off the rope while taking in slack. Always use both hands when taking in slack and use your non-brake hand to provide a back-up while you slide your brake hand up the rope. NO EXCUSES.
3. Practice, practice, practice! When you are belaying, someone's life is literally in your hands. Practice on the ground and have your climbing partner simulate climbing. Don't try to learn on the fly. Make sure you have the proper movements hard-wired into your brain before giving a true belay to a climber and demand this of your climbing partner in return.
