Setting a Traditional Anchor
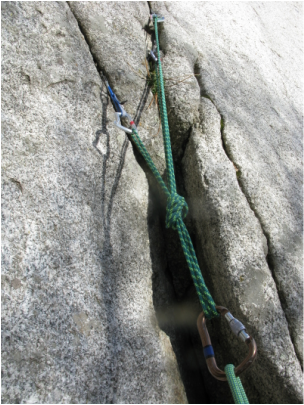 A traditional anchor with 3 points of connection.
Building an anchor for single-pitch traditional climbing
follows the same as for building a top-rope anchor. The main
difference is that with a trad anchor, you have approached your anchor site by
climbing up a route as opposed to walking to the top, and so your first
priority is to secure yourself. Once you get
the hang of setting up a single-pitch anchor, adapting it to a
multi-pitch anchor is easy.
Before attempting to set a trad anchor, you should you know the Basic Principles of Anchors. You will need to build an anchor system that meets the SARENE-SA guidelines:
On this page, we will go step by step through the process of building a traditional anchor, with consideration of these principles. You can use this as a general guideline for how to approach the building of an anchor, but be sure to receive professional instruction from a qualified instructor before attempting to build an anchor on your own.This is a very dangerous part of trad climbing, and it is crucial to learn the proper technique in order to climb safely. |
At a Glance:
Follow the basic SARENE-SA anchor principles:
|
1. Placing Protection
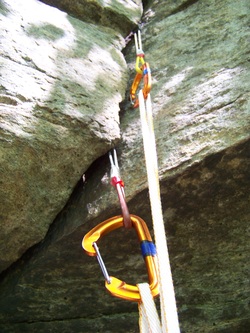
Two solid nut placements connected with a runner.
If there are no bolts at the top of your climb, you will
need to place your own gear to build an anchor. When you get to the top, your
first priority should be to find an obvious, bomb-proof placement. This will be
the centerpiece of your anchor, so it should be really good. Most routes end at
a good ledge, so you should be able to spend a few seconds finding a really
good placement. Be sure to consider rock quality, contact, potential for
walking, etc. You should know all the principles of a goodActive, Passive or Natural Anchor.
Once you make one good placement, secure yourself to it with either a Clove Hitch or Figure Eight on your rope, or with your personal anchor system. Now you are more or less safe, and can
move about without fear of falling. Don’t call off belay yet, though; that
comes later.
Now you will work on the Redundancy principle (R from SARENE-SA). Your one placement may be really bomber, but as always, you need to back it up. Look for at least two more good placements. Only trust Solid Anchors (SA of SARENE-SA). If you are skeptical of a placement, back it up. It is OK to use more than three anchor points...in fact, use as many anchor points as it takes to make you trust the anchor. Remember, you can sling trees and large rocks - just be sure to check their integrity!
Now you will work on the Redundancy principle (R from SARENE-SA). Your one placement may be really bomber, but as always, you need to back it up. Look for at least two more good placements. Only trust Solid Anchors (SA of SARENE-SA). If you are skeptical of a placement, back it up. It is OK to use more than three anchor points...in fact, use as many anchor points as it takes to make you trust the anchor. Remember, you can sling trees and large rocks - just be sure to check their integrity!
2. Connecting the Placements
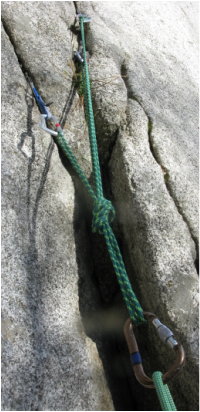
A cordelette connecting anchor points.
There are several acceptable methods for connecting your
placements, but one of the quickest and most secure systems, and the one we use
most often, utilizes a cordelette. This is the system we will cover here. To learn
about other systems, we recommend getting a copy of John Long’s Climbing
Anchors.
With the cordelette system, you will pass a cordelette through the carabiners on each placement, then grab the cordelette between each carabiner and pull the bights down and together. In other words, if you have three placements, you should have three bights of the rope: one between the first and second placements, one between the second and third placements, and one that loops down below all the anchors, connecting the first and third placements. These loops should be relatively long, because eventually you will need enough slack to tie a Figure Eight on a Bight or an Overhand Knot using all three loops. Be sure to pull the Double Fisherman’s Knot that is securing your loop of cordelette up toward one of the carabiners to get it out of the way, then pull all three bights in the direction of the anticipated load, i.e., down toward where your climber will be coming from. Be sure the tension between all of your anchors is Equalized as you apply force in the direction of the anticipated load (that's E from SARENE-SA). Check now for Small Angles between your anchor points (the SA from SARENE-SA). Tip: spread your index and middle fingers; the angles formed by the separate bights of the cordelette should be no wider than the angle between your fingers. This is important because when you have a larger angle, the force on each anchor increases exponentially. Tie a Figure Eight on a Bight with all the loops of cordelette, double checking that force will be evenly distributed among all the placements and along all the sections of the cordelette. A cordelette may only have a rating of 7 kN, but if there are 6 lengths of cordelette, that adds up to 42 kN! Also, by tying a knot, you insure that if one of your placements fails, you will have No Extension (NE from SARENE-SA). In other words, your anchor point below the knot will not go any lower if one of your pieces fails. If your system extends during a large fall, you will put a shock load on the remaining pieces, potentially causing enough force to tear out your entire anchor and send you and your partner flying to your demises.
Sometimes your anchor points are too far away from each other to use a single cordelette. Here, you can use slings and cordelette to extend the placements to make them reach each other. Consider using a Sliding X in this application. You can also set an equalized anchor between two placements and extend that anchor point to meet your other placements. Be extra careful here to use only Small Angles between your placements to avoid unnecessary force.
3. Belaying Off Your Anchor
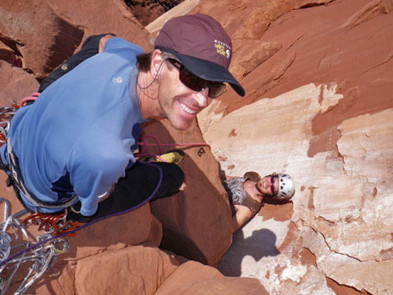
Andrew McLean belaying his second with an ATC-Guide. from Backcountry.com
Now that you have a
solid anchor, connect yourself to the main locking carbiner of your anchor via a clove hitch on your rope, or your personal anchor system. You can tell your belayer to take you off belay.
Immediately start preparing your anchor for a belay. We use the Black Diamond ATC Guide, an autoblocking device similar to the Petzl Reverso. This makes belaying a second very easy, and if you are going to be doing a lot of multi-pitch or trad, we recommend getting an autoblocking device. Here we will describe how to do a traditional belay, and how to use an ATC Guide.
Traditional Belay:
Imagine a trad stance belay as a normal toprope belay stance, but instead of standing on the ground, you stand at the top of your climb. The system is exactly the same. You pass the rope through a locking carabiner attached to your cordelette loop, and pull in slack until the rope is taut between you and your partner (be sure to read our section on Rope Management to avoid tangles!). Attach your belay device, lock all lockers in the system, get comfortable, and belay away. Imagine what would happen if your second were to fall. Where will the force go? Position yourself so that if your second is hanging on the rope for a long time, you won't be squeezed by the pressure of the ropeor forced into an unbearably uncomfortable position. Remember, as with building an anchor, you want to create Small Angles between the strands of the rope running through the anchor, so don't veer too far to either side. Ideally, you want to be standing almost directly below your anchor. This also creates friction on the carabiner and makes the belay easier.
Autoblocking Belay:
Compared to a traditional stance belay, a belay with an autoblocking device is fantastically easy and comfortable. The belayer experiences no force at all, and simply needs to pull in slack. However, just as with a GriGri, the belayer should NEVER take their hands off the rope. The device can potentially rotate, and the belayer must be ready to lock it off at all times.
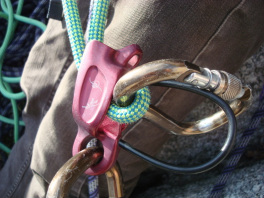
To set up an autoblocking belay: connect your belay device via the solid metal loop at one end to a locking carabiner attached to your cordelette loops, and lock the biner. Pull up any slack in the rope, and pass a bight of the rope through the device so that the rope enters the device at the top and exits below, on the teeth. Clip a locking carabiner into the loop you created and through the device’s wire, rotate the biner so the long side sits against the belay device, and lock it onto your anchor. If your climber. Lock off on the rope. Your second is now on belay. Pull through any slack, and belay away. As your climber climbs, you need only to pull on your end of the rope. In the event of a fall, the device will hold automatically. This also puts a direct downward force onto the anchor. If your climber needs slack, you can hook the nose of a carabiner into the small hole at the bottom of the device and pull back. This will release the autoblock and allow you to control backward flow of the rope.
Watch the video below for directions directly from Black Diamond on how to use their ATC-Guide. Always rely primarily on the instructions from the manufacturer.
Cleaning Your Anchor
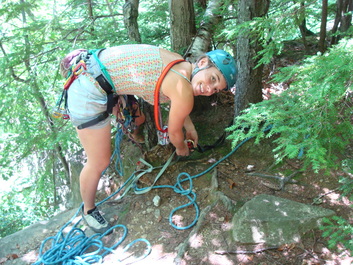
Cristina cleaning PVTA 5.7, Rose Ledges, MA.
Most of the time, you will set your anchors either at the
very top of a climb, or on a ledge above. Often you will be able to climb
up to secure footing and remove your placements one by one by reaching down to
grab them. You should definitely leave your top placement in until last, and
keep yourself attached to that point, in case you should slip. This is
inherently a very dangerous part of climbing, and you should use the utmost
care. Once you have all your pieces, simply walk offand go climb another
route.
If there is no walk off at your crag, and there are no permanent anchors or bomber natural anchors to rappel off, you will need to rappel down off the route, climb up to above your gear, set up another, secondary anchor, and rappel down to clean your anchor. You should definitely bring either an ascender or a prussik knot with you, so you can fuss with sticky placements without worrying about falling. After clearing your anchor, either ascend up to the top, or rappel down and hike back up to clear your secondary anchor. It’s a lot of work, but you won’t leave any gear in the wall.
If there is no walk off at your crag, and there are no permanent anchors or bomber natural anchors to rappel off, you will need to rappel down off the route, climb up to above your gear, set up another, secondary anchor, and rappel down to clean your anchor. You should definitely bring either an ascender or a prussik knot with you, so you can fuss with sticky placements without worrying about falling. After clearing your anchor, either ascend up to the top, or rappel down and hike back up to clear your secondary anchor. It’s a lot of work, but you won’t leave any gear in the wall.
