Basic Moves
If you think rock climbing is intuitive and anyone can do it and all you need is the gear, then you've got another thing coming. The technique behind propelling your body up the rock does not come easily to most people. So, don't get frustrated when you struggle up a face that your experienced climber buddy says is an easy 5.9 route. Knowing a few basic rules of thumb will help you achieve the balance, range of motion, and stamina needed for basic climbing. Here are a few tips:
Use Your Legs!
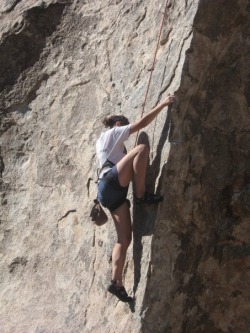 Kelsey using her legs on Headstone Rock, Joshua Tree
Those gambs you just used to stand up and get a drink of water are by far the strongest muscles in your body, so you really should use them. A good way to think of it is using your arms as a fulcrum point and your legs as pistons that propel your body upward. Just think how much easier it is to stand up than to do a pull-up. If you find yourself stuck on a climb, look DOWN and try to figure a way to move your feet up first. Often new climbers will focus only on their arms while getting frustrated and tired, not even noticing an awesome and easy foothold that would help them move past a tricky section. Also, the soles of climbing shoes are probably far stickier than you think. A small protrusion from the rock that looks minuscule may be a very good foot hold if you trust it and apply pressure into the rock as you stand. If you are having trouble getting accustomed to tiny footholds, it helps to do a low traverse along a wall and practice using footholds that you think will not work - chances are you will be able to use tiny crystals or ledges to work your way across the traverse. If you are climbing in a gym, work on traversing around the gym wall for a low-stress practice on hand and foot placements.
The climber in the photo has the right idea: "Get my feet high so I can reach better holds." A move like the one the climber is executing tends to feel less intuitive because it involves looking for footholds first, rather than hand holds. When it comes to technique, however, this climber has got it: her quads are much stronger than her biceps, and that foothold is probably more secure than anything she can grasp with her hands at this point. |
At a Glance:
Training suggestions: Traverse across a rock wall or your gym wall |
Hang Smart!
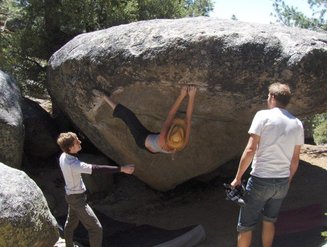
Hanging Smart
Think about the first time you grab a pull-up bar: you clasp your hands around the bar and lift up your feet to do a "dead hang." It's not too hard, right? But doing that pull-up sure is. And it is REALLY hard to hang with your arms bent at an angle. This is because you need to use your biceps, triceps and shoulder muscles to hold your arm bent. You use these muscles far more than you do when hanging with straight arms, which only works your hands and forearms. Hanging with straight arms uses the strength of your skeleton to hold your weight, while hanging with bent arms relies on your not-so-strong upper body strength. Trying to hold on to the rock with arms bent is another classic beginner mistake. Instead of trying to build your biceps, hang down with your arms straight and legs bent when you are between moves, just like the climber in the photo to the left. You will conserve energy and feel much better when you do stand up and go for that huge dynamic move.
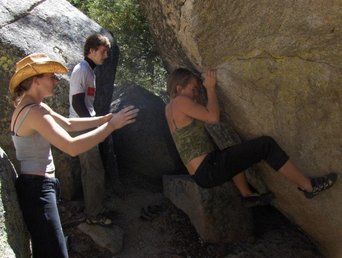
Not too smart
Whereas the climber above is hanging smart off her skeleton and conserving her energy, the climber to the right is keeping her arms bent and spending excess energy by hanging on her muscles. Not surprisingly, the climber above completed the boulder problem, while the climber to the right barely got past the first moves. If the climber on the right hung on the rock with her arms straight, she probably would have had the strength to complete the problem. This is a classic sign of a beginner climber, and one of the first techniques to learn when hitting the rock.
If you want an example of good technique, check out this video of gibbons at the Copenhagen Zoo, swinging around in the rigging in their pen. They have perfect form! ..
If you want an example of good technique, check out this video of gibbons at the Copenhagen Zoo, swinging around in the rigging in their pen. They have perfect form! ..
Use Conscious Footwork!
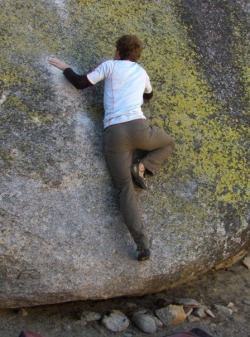
No handholds? Use your feet!
Another telltale sign of a beginning climber is when a gumbie reaches way up above their head to grab a hold, matches with their other hand, pulls up with both feet hanging, then proceeds to slime the rock with their shoes feeling for something, anything, to put their feet on. Inevitably they either get tired and hang back down to their original foot placements, or just peel off the rock. Being conscious of where you place your feet is incredibly important.
The "3 Points of Contact" rule can help you stay in control and conscious of your foot placements: unless you are standing on a big ledge or hanging by your arms, it almost always takes 3 points of contact to stay upright and on a wall. In other words, 3 hands or feet must be touching at all times, except occasionally when you are making a move. So what do you do with that last limb? Use it to move upwards! For example, if your feet are on a good ledge and your left hand is in a jug at eye level, you can reach up with your right hand to a jug above your head to the right. Holding on to both hands means you can free up a foot, and move it up to the next ledge. This frees up the other foot, which also moves up, and then you can reset your left hand and start the process over again. Moving in this way makes sure you are using all your limbs, won't get tired from wasted energy, and will give you a more rhythmic style which looks better and will help you improve.
Your climbing will also improve if you learn to start trusting your footholds. The rubber on climbing shoes is incredibly effective, and one of the first trials for new climbers is learning to trust that rubber. The climber in the photo is on a type of climb called "slab," meaning that the climb has a less than vertical angle, but has very few holds - almost like a blank wall. In order to climb this, the climber must trust the rubber on his shoes to stick to the tiny crystals in the rock. The climbing rubber is much more effective at using the minuscule holds on this rock than his hands, so in order to scale this boulder, he will have to rely mostly on his feet. By pressing his weight into the rock and applying pressure onto those tiny holds, he will be able to climb with ease to the top. Climbing slab rock will help you get used to trusting your climbing rubber and will quickly teach you what your shoes will and will not stick to.
