Cleaning a Trad Route
|
At A Glance:
|
Find someone with a lot of experience and patience, who is not just willing but enthusiastic. You will have a lot more fun, and they will too. If your teacher is always yelling at you to hurry up, you might want to find a new teacher. It takes a lot of time and a lot of practice to get good at trad, and you need to put in the hours, so pick your mentors wisely.
Warning: Do not fall into the Hero Worship trap. This is a common and potentially fatal mistake in any adventure sport. As a beginner, it is easy to get eager to go out with anyone you meet, to trust anyone who knows more than you, and to follow them blindly. Even if your leader is highly experienced, they are still human and can make mistakes and bad decisions. Always stay alert and question everything. Climbing systems are logical, so even with minimal experience, you can critique and play an active role in the team. Your opinions and concerns are valid, so be sure to form them and voice them while on the rock. If you catch your leader's mistake, you might save both your lives.
Warning: Do not fall into the Hero Worship trap. This is a common and potentially fatal mistake in any adventure sport. As a beginner, it is easy to get eager to go out with anyone you meet, to trust anyone who knows more than you, and to follow them blindly. Even if your leader is highly experienced, they are still human and can make mistakes and bad decisions. Always stay alert and question everything. Climbing systems are logical, so even with minimal experience, you can critique and play an active role in the team. Your opinions and concerns are valid, so be sure to form them and voice them while on the rock. If you catch your leader's mistake, you might save both your lives.
What to Expect Your First Day Out
Pay close attention to what you are doing. If you first read up on the basics of active and passive protection, you will find cleaning a route much more fulfilling, as you will be able to note the techniques in practice. As you remove a piece of gear, ask yourself some questions: Is the piece placed in the direction of anticipated force (usually downward)? Is the piece making good contact? If it's a nut, is it placed above a constriction? If it's a cam, is it over-cammed? under-cammed? Is the piece appropriately extended to prevent rope drag? When
you get to the top of the route, you can have a conversation with the
leader about some of the placements. If your leader is a good sensei, they will be happy to discuss placements, decisions, and tricks that they employed.
Think of the climb as a super fun classroom lesson, and so you should give your teacher your undivided attention, as you would in any other class. You will need:
How to remove gear:
|
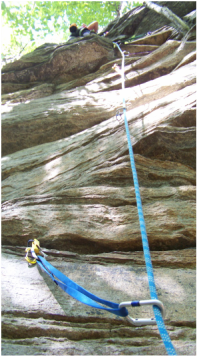
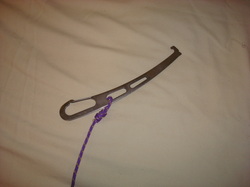 A Nut Tool: The Second's Best Friend 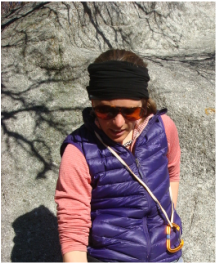 Cristina wearing a sling across her shoulder. Ready to clean a route. 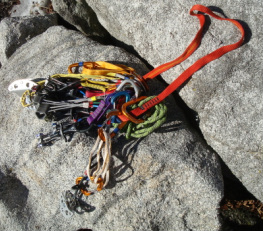 At the top of the route, you will have collected all the placed gear on the sling like so. |
- Cams should come out by simply pulling the trigger and pulling outward. Be careful not to push the cam backward into a position where it could become over-cammed, and thus hopelessly stuck. This is a common beginner mistake! Remember to take the rock formation into consideration, you may have to maneuver the piece up or down in order to get it out. If the cam is over-cammed, try sliding it one way or the other until the crack widens and you can maneuver it into a wider stance. If a cam walks backwards deep into a crack where you cannot touch it, it can get hopelessly stuck. If you can't reach the trigger, break out your nut tool, and hook the nose around the trigger bar, right in the middle. Holding the nut tool steady, carefully push the handle of the cam ever so slightly into the crack. The lobes will contract and the cam will be free! If you pull on the trigger instead, you will get no results whatsoever, and you might break the trigger. Don't do it.
- Nuts should come out with a quick tug upwards. Nuts are generally placed above constrictions, by tugging upwards, you are removing them from the constriction. Nuts get stuck more often than cams, hence the nut tool. If you find a stubborn nut, use the head of your nut tool to generate torque on the nut in order to get some play. Use leverage to push the nut away from the direction it is aiming. Still stuck? Poke hard at it with your nut tool. If you are absolutely at a loss, leave it and offer your partner to replace it. Nuts are cheap!
Don't Lose My Pro, Bro!
As a following climber, you are responsible for removing the pro from the wall. Especially if the gear isn't yours (and at this point it probably isn't), you need to make sure that you don't leave any gear in the wall. This is important for two main reasons:
Sometimes pieces do indeed get completely stuck, but if your leader places all their gear well, you shouldn't have any problem getting it out. If this happens, talk it over and figure out a plan for paying for the gear.
- You may need that gear further up the climb and your safety will be compromised without it.
- Gear is expensive. Unless you're loaded, you don't want to be leaving $80 pieces of equipment unless you absolutely have to.
Sometimes pieces do indeed get completely stuck, but if your leader places all their gear well, you shouldn't have any problem getting it out. If this happens, talk it over and figure out a plan for paying for the gear.
(Not) Dropping Gear
If you drop a carabiner from a height of four feet onto rock, it should usually be retired. Invisible cracks can form in the aluminum, drastically lowering the strength. Now imagine how dropping a cam four hundred feet onto rock would affect its strength. To reduce your chances of dropping gear, follow this process with each piece:
1) Find a solid stance, so you can free up one or both hands for a decent amount of time.
2) Leave the carabiner and sling attached to the rope, pull the gear out of the wall and let it dangle off the rope.
3) Unclip the gear from the rope and immediately clip it to your harness or sling.
4) Shorten the length of the sling if necessary by clipping the cam directly into the carabiner attached to your harness.
This process will insure your leader's gear is safe and sound.
