Setting a Multi-Pitch Anchor
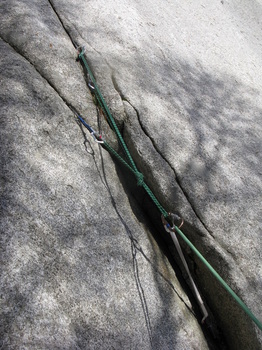
 Cristina on the third belay of Whitney-Gilman Ridge, Cannon Cliffs, NH.
If you are confident with your abilities to climb trad and to set a good Trad Anchor at the top of a climb, and you want to get some serious altitude, it's time to get on a multi-pitch climb. These are the goods right here: hundreds of feet up, exposure, stellar views, and a real sense of adventure. The basic premises are mostly the same as setting a top-rope or trad anchor, but you also need to consider that the leader is going to climb above your anchor. This means you need to consider several things in your anchor: The Lead Swing, Multi-Directionality, and Fall Factors. We will discuss these issues one at a time here, and outline what your anchor needs to be safe, quick and convenient.
Be sure to read this whole article before attempting to build a multi-pitch anchor. This is important info, so give it some time to sink in. |
At a Glance:
|
The Lead Swing
Unless you are a tour guide, your climbing partner will want to climb at least a few pitches of any big climb, and most likely every other pitch. As such, you need to consider how to trade off, or "swing," pitches. If your belay stance is large and you can move around easily, this isn't a big issue, but if you only have a shoebox to stand on, or are even hanging, you will need to consider:where your climber is coming from; where they will stop to pass off the rack, reconfigure the belay, etc.; and where they are going. Once you have an anchor set, it is good to be able to move slightly to a side to belay, so that the climber doesn't climb through your legs to get to a point where they can anchor in. This will also give them space to move around. To achieve this, you can attach your personal anchor or clove hitch to a side placement in your anchor, away from the main anchor point. It is also important to consider what pieces you use in the anchor.
It might be really convenient to use three #2 Camalots, but you are
most likely stripping your leader of all of those pieces, which may
leave him/her in a sticky situation higher up. Try to use a range of
pieces for this reason. Consider your belay stance as well; you might want to face outward for the second belay, then turn around for the lead belay. Try to arrange a system that gives you some play, but not too much. You definitely want to be able to get to all the points on the anchor, in case something needs adjusting during the climb.
How the swing works:
After you get to the top of the climb, secure yourself and build your anchor, you will set up your belay, either through the central point of the anchor with a normal belay device, or off a locking carabiner if you are using an autoblocking device. You will belay your climber up to you, then they will secure themselves with a personal anchor or Clove Hitch. They have cleaned the pitch, so they will have a large amount of the gear. You will (carefully) hand them the remainder of the rack, and they can rack it to their preferences. A gear sling puts all your eggs in one basket here, but if you are careful it will work well. If you are really nervous you can attach a runner to the rack and your harness, pass the rack, then unclip the runner. If you were using an autoblocking device, detach it from the anchor and attach it to your belay loop, locking it (if you are using a traditional belay, you are already here). If your anchor is bomber, clip the rope into the uppermost piece of the anchor, and you are ready to belay. This slightly reduces the fall factor for your leader (see below). If your anchor is questionable, it is better to just belay off your harness directly to the climber. This will hurt A LOT in the event of a leader fall before a placement, but your body will absorb some of the shock and your anchor is less likely to rip out. Now your climber will get fully ready, unclip or untie from the anchor, and lead on! A successful swing! It is always a good idea to put in a good piece as soon as possible if you are leading from a multi-pitch anchor.
Multi-Directionality
An anchor with an oppositional nut below.
As your climber climbs on above you, placing pieces, you are essentially
giving them a normal lead belay. However, consider what will happen if the leader takes a fall: you are going for a upward ride and the anchor you are attached to will be jerked along with you. If this happens, you will compromise your belay, tear out the downward
directional placements in your anchor, and potentially injure yourself. It is
therefore important to consider multi-directionality in your anchor. In
other words, your anchor should be good for a downward pull (ex: the belayer hanging on it), but also an
upward pull (ex: the belayer being jerked upwards during a leader fall from above).
The rule of thumb with multi-pitch anchors is a minimum of 4 pieces: 3 downward directional, and 1 upward directional. If your 3-point anchor happens to be good for both upward and downward (ex: one or more of the placements are all flexible cams in a horizontal crack), you still need to consider placing another upward directional because in the event of a leader fall you are more likely to pivot up and around the anchor and hit the rock abruptly.
To make your anchor multi-directional, simply place a piece pointing upward below the rest of your anchor, and tie it off taut to the anchor and yourself, using a runner or length of rope. This is called an oppositional piece. This will stop you, the belayer, from rocketing upward in the case of a fall. Upward directional pieces never take really large forces, but they should be relatively bomber, and unable to fall out (particularly a problem with oppositional nuts). You can use the tension from the runner to hold the piece tight.
Fall Factor
It is important to consider the fall factor potential when climbing because
the higher the fall factor, the higher the stress on your belay, anchor
and rope. So what is a fall factor? When a climber takes a fall, it registers on a scale of 0 to 2. The fall factor (F) represents the ratio between the vertical distance the climber falls (h = height) and the total length of rope out (l = length of rope). You can use a simple equation to think about fall factor:
F = h/l. A high fall factor (2) generates a dangerous amount stress on the rope, anchor, belay, and the faller's body. Conversely, a low fall factor situation (o), such as top roping, means relatively low stress throughout the system during a fall. Consider the examples to the right for illustrations of high and low factor falls.It is important to consider fall factor potential so that you can make wise decisions about the anchor you are setting, your belay stance, and whether or not a climb is worth the risk to all members in the party. The great thing about a dynamic rope is that it is just that: dynamic. The rope will stretch a certain amount relative to the length between the climber and the belayer. If there is a lot of rope out, it will stretch a lot (decreasing the fall factor). If there is not much rope out relative to the fall, if won't stretch much at all and the resulting force on the climber, belayer and anchor can be quite high. The stretch reduces the force. Would you rather jump out of a second story window onto a pile of mattresses, or onto asphalt? The deceleration occurs over a longer distance with the mattresses (and with lower factor falls), so the catch is softer, and the force is less. Your climbing anchor may be really strong, but a very large factor 2 fall will tear bolts out of a wall, snap ropes, break backs, and generally cause havoc. When you set an anchor, therefore, it is important to consider the available protection above. If your climber can place a piece very close to the anchor, that's a good thing. By routing the rope up then down, you reduce the fall factor by quite a bit. You can also sometimes get a bit lower below the anchor and use it as a first placement. If there isn't much above the anchor, and a large fall is likely, you might be better off building your anchor a bit lower or higher. If these aren't options, you need to build a really bomber anchor that is well equalized. This will distribute the force more evenly between all the pieces. Be sure to consider nearby placements and how good your anchor is relative to the falls it may sustain. It is ALWAYS better to be on the safe side when building multi-pitch anchors; your and your partner's lives are worth a few extra minutes. |
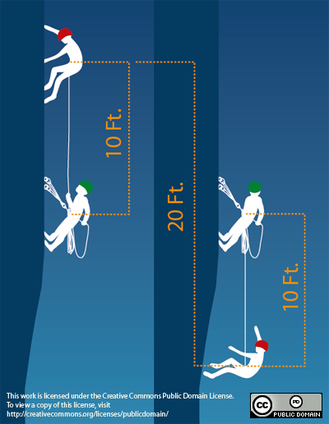 A factor 2 fall puts extreme stress on the entire climbing system. Examples
Remember: F = h/l
In the first example, the fall factor is approximately 0 and there is very little stress on the anchor, belay, rope, and the climber's body during the fall. If proper anchor principles and procedures are applied, this situation should not be traumatic. In the second example, the fall factor is 2, the largest it can possibly be. The stress on the anchor, belay, rope, and climber's body is incredibly severe. A fall of this magnitude has the potential to harm the climber and to compromise the anchor and the rope. |
