Managing Rope Drag
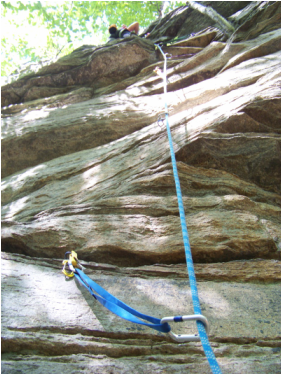 This extended alpine draw makes for a nice straight rope line.
Rope drag management is an important part of gear placement. On a straightforward vertical crack, all the pieces line up, so the rope travels in more or less a straight line. However, on anything but perfect splitters, you will ramble and weave as you go up the route, and the carabiners attached to your placements and the rock itself will create drag on the rope. Rope drag can be really tough. On the crux pitch of Whitney-Gilman Ridge on Cannon Cliff, Rob could barely stand up at the top of the route because the drag was so intense. Often you can avoid serious rope drag by picking a more direct line or climbing shorter pitches, but it is often unavoidable. In this case, you will need to allow the rope to move away from the placement, so that it can move more freely. You do this by extending your placements; attaching a runner to your gear to give the rope more free play.
|
At a Glance:
How to extend placements:
|
The Alpine Draw
The best tool for managing rope drag is the alpine
draw. This is the only kind of quickdraw most trad climbers
bring on climbs, since it is more versatile than a sport draw and more
convenient than a sling over your shoulder. In the video below, Cristina describes how to rack an alpine draw. To extend a placement, simply clip one of the alpine draw's carabiners into the sewn runner attached to the cam or through the loop on the nut, and pull the other carabiner off two of the three loops of the alpine draw (see video if this sounds confusing: it's not). Clip your rope into this, and you have an extra two feet of play in the rope line. This will lower the height of your last clip, making a fall slightly longer, but usually reducing rope drag is well worth the fall potential. If you are in danger of hitting a ledge or decking out, you may not want to extend your clip. Only you can decide in each situation.
Places to consider extending your placement include:
Places to consider extending your placement include:
- Underneath overhangs, particularly in corner placements
- When the route turns sharply
- In deep dihedrals
- Where your lower carabiner falls on a sharp edge (to prevent breakage)
