• Home
  • Basics
    • Types of Climbing
    • Understanding Route Grades
    • Basic Principles of Climbing Anchors
    • Toprope Belay
    • Rappelling/Abseiling
    • Safety Checks and Commands
    • Basic Moves
    • Basic Knots and their Applications >
      • Figure Eight
      • Figure Eight on a Bight
      • Overhand on a Bight
      • Barrel Knot/Double Fisherman's
      • Girth Hitch
      • Clove Hitch
    • Beginning Gear
    • Other Basic Stuff >
      • Which Belay Device Should I Buy?
  • Sport
    • Sport Leading: Basics
    • Clipping Bolts on Lead
    • Lead Belaying
    • Setting a Bolted Anchor
    • Intermediate Moves
    • Sport Climbing Gear
    • Other Sport Stuff >
      • Sliding X: Too Much Extension?
      • Expert: Ground Runner Belay
      • Preventing Rope Drag
  • Traditional
    • Cleaning a Route
    • Placing Protection >
      • Placing Passive Protection
      • Placing Active Protection
      • Using Natural Protection
      • Preventing Rope Drag
    • Setting a Traditional Anchor
    • Setting a Multi-Pitch Anchor
    • Rope Management
    • Knots for Trad >
      • Munter Hitch
      • Munter-Mule Knot
      • Butterfly Knot
      • Yosemite Bowline
      • Prussik Knot
      • Klemheist Knot
      • One-Handed Clove Hitch
      • In-Line Figure Eight
      • Water Knot
    • Crack Climbing Techniques
    • Building A Rack
    • Other Traditional Stuff >
      • Emergency and Rescue Techniques >
        • Escaping the Belay
        • Ascending a Rope
  • BLOG, etc.
    • THE DIRTBAG BLOG
    • Climbing Vocab and Jargon
    • Climbing Library: Books and Movies
    • Climbing Videos
    • Our Favorite Climbing Products
    • Links
  • Contact Us

Placing Passive Protection

Picture
Cass Crane aiding and placing a nut on Gladiator 25m 18 at Frog Buttress, Mt. French, S.E. Queensland Australia. Photographer: Phil Box
Passive protection is protection that does not actively cam in the rock, and does not have moving parts. Contrarily, a piece that "cams" is a piece that applies increasing pressure outward, against the walls of crack, as it is pulled downward; this is also known as Active Protection. Passive protection relies on constrictions in cracks to hold it in place. The most common types of passive protection are nuts or stoppers. Hexagonal wedges (hexes), Tri-Camming Units (tri-cams), and even Spring Loaded Camming Devices (or SLCDs or cams) can all be used as either active or passive protection. These pieces must be placed differently according to the application desired. Become familiar with each type of piece and its various placements and applications. Big Bros, spring-loaded tube chock, are another form of passive protection used in large cracks (mainly > 6.5 inches). They are incredibly strong and a great feat of engineering, but not as widely used, so we will not focus on them here.
At a Glance:

Your Passive Pro Rack:
Nuts a.k.a. Stoppers
Hexes
Big Bros
SLCD (Cams) *placed passively
Tri-Cams *placed passively

Pros of passive pro:
Bomber
Reliable
Quick to place
Lighter than cams
Durable equipment
Cheaper than cams

Cons of passive pro:
Susceptible to rope drag
Pieces hard to remove
Steep learning curve
Constriction in rock necessary


​Passive protection is incredibly strong, durable, and reliable. A solid nut placement in a crack is bomber enough to take a big fall from a lead climber. A downside to passive protection is that it is more likely to pop out with rope drag. It is always best to extend nut or hex placements with a quickdraw or an extended alpine draw, according to the anticipated direction of the climb. Another downside is that nuts can be extremely difficult to remove from the rock, especially if the leader fell or sat on the piece. Black Diamond and Metolius both make nut tools, which are designed to help the second remove difficult placements.

Example Placements:

Picture
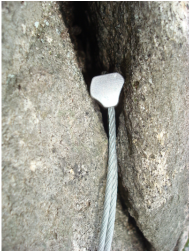
A decent passive placement of a hexagonal wedge (hex). The crack is a bit flaring, so extending this piece with a runner will be important to reduce the play on the piece from rope drag.


Picture
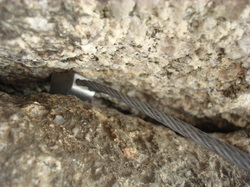
A successful horizontal placement of a chock. The nut was slid in sideways, then pulled into place. Extend this placement with a runner to avoid pulling it loose.
So what makes a good passive protection placement?
  1. The piece is wedged into a constricting section of a crack. Inspect the rock and find the best match between the geometry of your piece and the geometry of the constriction.
  2. The piece is making good contact on all sides contacting the rock. You want to see continuous contact between the rock and the metal - no bulging crystals or knobs. Always maximize the surface area of your piece contacting the rock.
  3. There are no large open cavities behind the piece that it could fall into, potentially rendering it useless. Watch out for this, and always visually inspect the crack you are placing into for variations in width between the front and the back of the crack. If you find yourself in a situation where there is an open cavity behind your otherwise bomber placement, consider placing a larger nut in that open cavity. You run a risk here, however, because you might not be able to visually inspect that piece to make sure it is making good contact or is in a constriction. Your best bet in this case may be to find another placement.
  4. The piece is contacting solid rock. Your gear is only as strong as the rock it is touching. Stoppers create large outward force during a fall; if your piece is behind a loose flake or block it will be coming down with you as you fall. Not good!
  5. The cable (or sling) hangs in the direction of the anticipated pull (i.e. downward!). This helps ensure that in the event of a fall, your piece stays in the position you placed it (rather than get jerked around) and the force is applied downward into the constriction beneath your piece.
Other considerations on Passive Protection:
  1. Usually, the most obvious placement is the best one. Avoid awkward moves and stretching to place your stopper. Similarly, the primary position of a given piece is generally the strongest. While most passive pieces can be placed in several directions, there is generally a strongest, or primary position. Familiarize yourself with this placement and use it whenever possible.
  2. Practice on the ground before getting on the sharp end. Placing passive protection can be tricky. Rock and mortar fireplaces can make good classrooms, especially on rainy days. Have an experienced friend inspect your placements and correct any faults before you take your mistakes up a route with you.
  3. Climbing gear is not made to last forever. Inspect your wires for kinks or abrasions and inspect the heads of your nuts for abrasions or cracks.

For a more in-depth discussion of what makes a good passive placement, we recommend John Long's book Climbing Anchors. He goes into great depth about what makes for good protection.
Powered by Create your own unique website with customizable templates.