Safety Checks and Commands
One topic always introduced early on but seems to get lost on intermediate climbers is the safety command and checks system. Considering how incredibly easy these things are, it is amazing that even experienced climbers forgo them. Climbing legend and our personal hero Lynn Hill once fell 72 feet into a tree because she didn't do the basic checks before starting up a climb. She got lucky and survived, but most don't. Face it: this is a dangerous sport, and it is very important to have a process to follow every single time you tie into a rope or begin climbing. Climbers with long, healthy careers have routinized systems that they execute every time before they hit the rock. Develop your system early on so it becomes second nature.
Before you climb, you need to check the following 5 things: |
At a Glance:
Before you climb, check 5:
|
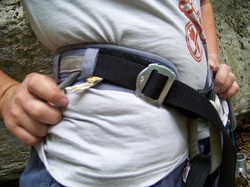
1. Double Back Your Harness Buckles

Properly double-backed harness
1. Your harness buckles should be doubled back in 3 places: Left Leg, Right Leg and Waist. When you put on your harness, you should always finish completely before you start anything else. Do not take a sip of water, do not uncoil the rope, do not pass GO and collect $200. If you do not double back your harness, in the event of a fall your harness may pull open, sending you all the way down to the ground and into a casket.
Hot Tip: If you see a circle of metal at the buckles, or an "O", that means "Oh S**t." Fix any "O" buckles immediately when you notice them.
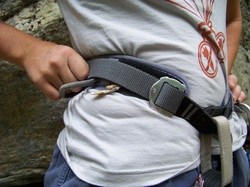
The photo to the left is properly doubled-back. The photo below shows what an "O" buckle looks like - FIX IT! The sight of a harness buckle that looks like this should strike fear into every climber's heart!
Hot Tip: If you see a circle of metal at the buckles, or an "O", that means "Oh S**t." Fix any "O" buckles immediately when you notice them.
The photo to the left is properly doubled-back. The photo below shows what an "O" buckle looks like - FIX IT! The sight of a harness buckle that looks like this should strike fear into every climber's heart!
WRONG! NOT DOUBLED-BACK! DANGEROUS!
2. Figure Eight Tie-In and Safety Knot
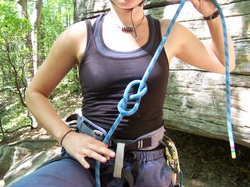
Always ensure that your Figure 8 is doubled back, and your Safety Knot is in place. Look for the ten bits of rope: eight bits on the Figure 8 and two on the safety knot. Checking whether a Figure 8 is correctly tied or not becomes second nature, but you still need to check every time you leave the ground.
Watch the video below for a demonstration on how to tie the the Figure Eight and Safety Knot.
Watch the video below for a demonstration on how to tie the the Figure Eight and Safety Knot.
3. Check Your Belayer's Harness
Properly doubled-back harness
Your Belayer's Harness is doubled back in 3 places: Left Leg, Right Leg and Waist. Exactly the same as for you. If their harness falls off, they will be fine, but you will look a bit like a plate of spaghetti. Remember, "O" buckles stand for "Oh S**t."
4. Check the Belay System

Properly loaded ATC-XP
The rope should pass through the belay device and the carabiner attached to the belayer at their secure belay loop. This seems simple, but it is not difficult to lock off a carabiner attached only to the belay device. In a fall, the rope will pop out of the device like a champagne cork, burn your belayer's hands and you will deck out. Check it to be completely sure.
Also make sure the belayer's locking carabiner is locked-off. It is easy to check. Have your belayer squeeze on the gate. If it is locked-off, you should hear a high-pitched *click.* If it's not locked off, it will open easily and your belayer will be embarrassed and fix it.
Also make sure the belayer's locking carabiner is locked-off. It is easy to check. Have your belayer squeeze on the gate. If it is locked-off, you should hear a high-pitched *click.* If it's not locked off, it will open easily and your belayer will be embarrassed and fix it.
5. Go Through the Starting Commands
Once you have done all those checks, which took you maybe 5 seconds tops, you are in a secure system....or are you? But before you jump on that rock and scamper on up, you should make sure that your belayer is paying close attention to what you are doing. Your ropes might be good, but they won't do you much good if your belayer brake hand is around a nalgene instead of the rope.
In the climbing world there is a standard relay of commands that will be the same whether you're climbing in Malibu Creek or Indian Creek. These somewhat dramatic commands ensure that the climber is secure and that the belayer is prepared to brake any falls. They become increasingly useful on multi-pitch climbs when the belayer and climber may be separated by 100 feet of rock and wind and cannot see each other.
The commands go as follows:
Climber: "ON BELAY?" As in, "Am I on belay?"
Belayer: "BELAY ON." The climber is secure in the belay system. The belayer is ready to brake any falls.
Climber: "CLIMBING." This notifies the belayer that you have left the ground and your life is now in their hands.
Belayer: "CLIMB ON." or "CLIMB AWAY." The belayer acknowledges the start of the climb.
