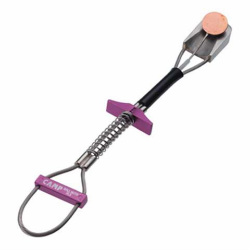
Placing Active Protection
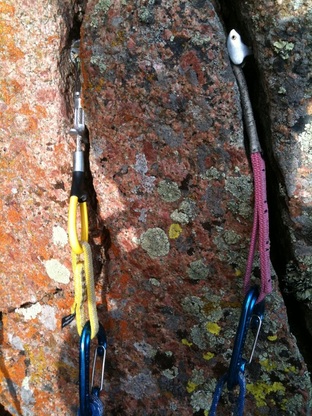 Spring Loaded Camming Device (left), Tri Camming Unit (right)
Active Protection consists of Spring-Loaded Camming Devices (cams), active Tri-Cam placements, active hex nut placements, and sliding ball-nuts. This type of gear is active because as force is applied to the device, it applies more force to the rock, creating more friction. In other words, the harder you pull, the tighter it holds.
Active protection is incredibly versatile. You can place it in vertical, horizontal and diagonal cracks and some pockets. Some cams even work in flaring cracks. Active pro is particularly useful because a single piece will fit a range of crack widths. Conversely, because most active pieces have mechanical moving parts, they are much more fragile than nuts and hexes. They also require maintenance, including cleaning and lubrication. |
Your Active Pro Rack:
Spring-Loaded Camming Devices (Cams) Tri-Cams *placed actively Sliding Ball-Nuts Hexes *placed in active orientations Pros of Active Protection: Versatile Easy and quick to use Fit a range of crack widths Can work in horizontal cracks Cons of Active Protection: Expensive Fragile parts Tri-cams require careful placement Can walk into a cavity Don't work in every crack Heavier than passive pro |
Cams
Spring Loaded Camming Devices (SLCDs), or Cams, are the most common type of active protection, will make up a large part of your rack (and will drain your paychecks the quickest!). They consist of a shaft or handle, an axle, a trigger, and three or four lobes. When you place them, you pull a trigger and the lobes rotate, giving the cam a lower profile. After inserting the cam into a crack, you release the trigger and the head expands until it makes contact with the rock. Some cams have two axles, such as Black Diamond C-4's, while most others have one axle. The extra axle gives you a slightly larger range in each cam.
Cams work in parallel, constricting and very slightly flaring cracks. If they have a flexible stem (almost any cam except old Wild‐Country Friends), you can place them in horizontal cracks. If you have a rigid stem cam, it is possible to tie it off closer to the lobes and use it in horizontal cracks, but if you don't, you run the risk of breaking the cam if you fall on it.
Our favorite cams are the Black Diamond C-4's because of the double‐axle design and the smooth action. We also like the Metolius TCU's for their action and good feel. For economy, try Rock Empire cams. They are not as nice to use as Black Diamond or Metolius, but they are between $1o an $20 cheaper, and perfectly safe. Beware buying or even using previously owned cams, unless you know their history.
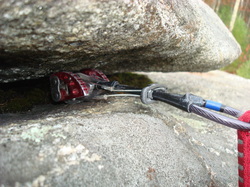
What makes a good cam placement?
|
Example Placements:
|
Tri-Cams
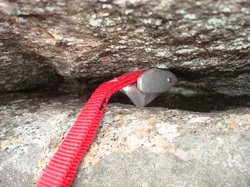
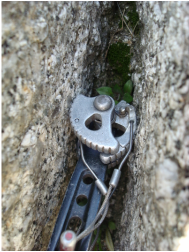
A tri-cam in it's active, camming position.
C.A.M.P. Tri‐Cams are handy pieces of protection that will fit in places no other pro can. They have a runner attached to an axle, two rails and a point. They can be used as passive protection if the axle is lower than the rest of the piece; in this orientation, they make for sharply angled nuts. The real magic begins when you turn the tri‐cam around, set the point in a slight dimple or constriction, and set the rails against the opposite wall, as pictured to the left. The strength of the piece increases substantially, and they become fantastically useful. Tri‐cams work beautifully in small pockets and horizontal cracks. They also work well in vertical cracks, and sometimes give better placements than cams. They do require a slight dimple or shelf in the crack. Tri‐cams are a crucial part of any Gunks rack, because of all the horizontal cracks.
The only drawback of using tri‐cams is that they can be difficult to remove, particularly if they sustain a fall. Some really tricky placements require two hands to extract. First try pushing the piece, then wiggle it side to side. As a last resort, try levering or hitting the tri‐cam with your nut‐tool.
The only drawback of using tri‐cams is that they can be difficult to remove, particularly if they sustain a fall. Some really tricky placements require two hands to extract. First try pushing the piece, then wiggle it side to side. As a last resort, try levering or hitting the tri‐cam with your nut‐tool.
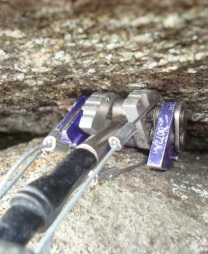
Sliding Ball‐Nuts
We don't have a lot of experience with sliding ball-nuts, as they generally substitute small cams and nuts, and can be difficult to remove. However, we have met climbers who swear by them. Ball‐nuts are a low‐profile form of protection, and are very light. They are composed of two parts: a thin wedge of metal with a grooved track, and a hemisphere attached to a wire. With the pull of a trigger, the ball slides down the groove, making the whole piece thinner. After the ball‐nut is placed in the crack, the climber releases the trigger and pulls, which wedges the ball higher in the groove, against the wall. They can be used with care in very thin parallel and constricting cracks. Currently, C.A.M.P. is the only company manufacturing ball‐nuts.
To remove a ball‐nut, pull the trigger to pull the ball down the groove. If this doesn't work, push or lightly tap the wedge upward into the crack with your nut tool while pulling the trigger.
To remove a ball‐nut, pull the trigger to pull the ball down the groove. If this doesn't work, push or lightly tap the wedge upward into the crack with your nut tool while pulling the trigger.
