Clipping Bolts on Lead
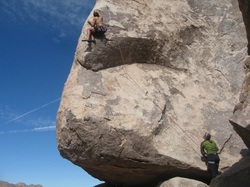 Thad Houston, Headstone Rock, Joshua Tree
Watch our instructional video below to learn how to clip into quickdraws while leading sport or trad. Rob describes various methods of making clips and also describes common dangerous mistakes (also discussed in depth below).
We recommend that you hang a quickdraw off a hook in your room and practice making the clips properly from the ground at least a hundred times before getting on the sharp end. Have a friend inspect your clips to make sure you are not passing your fingers through the gate or back clipping. Remember that when you're clipping on lead, you usually only have one hand available to make the clip (the other is holding on to the rock), so practice using only one hand. Put on some good tunes and clip away! It is crucial that you receive professional instruction on how to lead. Do not use this guide as your only form of instruction! |
At a Glance:
Clipping Bolts on Lead:
|
Major DON'TS of Clipping Bolts
1. Don't pass your fingers through the carabiner gate!
If you fall while your finger is in the gate, it is likely that you will seriously injure your finger and may even "de-glove" it (rip all the skin
off). Yeah, gross. DON'T DO IT! Practice making clips that use the rope to open the gate rather than your finger (demonstrated in the video above). Be sure to practice these techniques with each hand in order to simulate leading.
2. Don't Step Behind the Rope!
The result of a fall with a foot behind the rope - OUCH!
Stepping behind the rope is a major cause of climbing injury and death each year, although it is fairly easy to avoid. If your rope passes across the back of your leg, or could potentially pass across the back of your leg, you are IN DANGER. When you are above your last point of protection, there are three ways
you can be oriented in respect to the rope. First, you can be centered,
with the last clip directly below you, so that the rope passes more or
less vertically from the last clip up between your legs to your harness.
Or you can be offset above your last clip (ex: your left foot
is to the right of the last clip, or visa versa). This is when stepping behind the rope becomes an issue because it is much easier to pass your foot behind your rope as you make a move from the offset position. Consider for a moment what will happen if you fall. The rope will
become taut, creating a straight line from your harness to your last
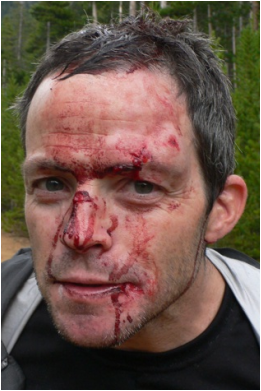
piece of protection, but your leg is in the way. The resulting tension will flip you like a pancake. In a best case scenario you will only get wicked rope burn, but you can also smash your head very hard on the rock (see photo), or even potentially slip out of your harness.
All bad, and all relatively easy to avoid. Especially when you are just
starting, it is easy to step behind the rope and not realize it. So climb with attentive and knowledgeable belay partners who will call you out when you are doing something dangerous.
We found this story and photo off someone's climbing blog. Sounds like he stepped behind the rope and didn't realize it even after the fact. Classic scenario:
I jumped on a hard sport route, and at the steepest part I pitched off ... [I was] launched into a back flip, and somehow along the way the rope spun me and I swung back into the wall head-first. Smashed my head and face, blood dripping into space, gnarly. Fortunately my neck is fine and I didn’t fracture my skull.
- Kelly Chordes (also see photo)
3. Don't Z-clip the rope!
The second potentially fatal mistake that many climbers make is to
"Z-clip." Z-clipping is when you clip the rope to your next bolt from below your last
piece of pro. This is most common on routes with bolts
closely spaced and when the climber grabs blindly below his/her waist
for the rope to make the next clip. Instead of
gaining a higher point of protection, the climber bypasses the highest
clip, creating a false sense of security and giving his/herself extra slack.
A fall would send you flying and potentially down to the deck. Luckily, you will know immediately if you are Z-clipped:
there will be an immense
increase in rope drag as soon as you start climbing, which
hopefully doesn't pull you off the route. To fix the problem, downclimb
to the incorrectly clipped quickdraw and unclip it. Re-clip the quickdraw using the rope hanging from the top quickdraw closest to your belayer. Your belayer is now able to take in
the slack, and you can continue your climb. Once again, it is important
that your belay partner is aware of this hazard and can help you notice
it before it is too late.
4. Don't Back Clip the rope!
Back Clipping is another potentially fatal mistake that a leader can make. Back Clipping involves passing the rope through your quick draw from the front, rather than from the back (i.e. backwards).
The rope should pass from the back of the quickdraw and up and out the
front of the draw to the climber above. In the event of a fall, the rope
pivots securely on the nose of the quickdraw.
If you incorrectly pass the rope from the front of the quickdraw and
out through the back of the draw, in the event of a fall, the rope could pass through the gate,
unclipping you from your protection. You would fall to your next
quickdraw and potentially all the way to the deck. Again, this is an easy mistake for a
beginner to make. Climb with a knowledgeable belay partner while you are learning so they can inspect your clips and ensure you are not back clipping.
